.jpg)

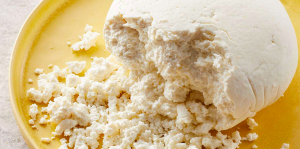
How to make cheese at home?

Introduction:
Making cheese at home can be a rewarding and fun process. There are many different types of cheese, and the process can vary depending on the type you want to make. Here's a simple recipe for making a basic homemade cheeses:
Ingredients:

- 1 gallon of whole milk (avoid ultra-pasteurized milk)
- 1/4 tablet of rennet (vegetarian or microbial rennet if you prefer)
- 1/4 cup of cool, chlorine-free water
- 1/4 teaspoon of mesophilic culture (for cheddar, Colby, or jack cheese)
- 1 teaspoon of cheese(paneer) salt (non-iodized)
- Cheese wax (optional for preserving and aging)
Learn Balanced Diets for Diabetes
Equipment:

- Large stainless steel pot
- Thermometer
- Long knife
- Cheesecloth
- Colander
- Cheese mold (optional)
- Cheese press (optional)
Instructions:
1. Prepare Equipment:
Before you start making paneer at home, it's crucial to ensure that all your equipment is clean and sanitized. Proper sanitation helps prevent the growth of harmful bacteria and ensures the success of your cheese-making process. Here's how you can prepare your equipment:
Gather Your Equipment:
- Large stainless steel pot
- Thermometer
- Long knife
- Cheesecloth
- Colander
- Cheese mold (optional)
- Cheese press (optional)
Clean and Sanitize:
- Wash all the equipment thoroughly with hot water and a mild detergent. Pay special attention to surfaces that will come into direct contact with the milk and cheese.
- Rinse the equipment thoroughly to remove any soap residue.
- Sanitize the equipment using one of the following methods:
- Boiling: Immerse the equipment in boiling water for at least 5 minutes.
- Bleach Solution: Mix 1 tablespoon of unscented household bleach with 1 gallon of water. Submerge the equipment for 2 minutes, then air dry. Ensure that the bleach is thoroughly rinsed off.
Note: Make sure the sanitizer or bleach used is food-safe and suitable for the specific equipment.
Prepare Work Surface:
- Wipe down your work surface with a clean, damp cloth to remove any dust or debris.
- If you have a dedicated cheese-making area, make sure it's clean and free from potential contaminants.
Assemble Ingredients:
- Gather all the ingredients you'll need for the cheese-making process. This includes milk, rennet, mesophilic culture, cheese salt, and any other specific ingredients for the type of cheese you're making.
Check Thermometer Accuracy:
- Ensure that your thermometer is accurate by testing it in boiling water. It should read close to 212°F (100°C). If it's not accurate, consider calibrating or replacing it.
By taking these steps to clean, sanitize, and prepare your equipment, you create a clean and safe environment for making cheese at home. This helps ensure the success of your cheese-making venture and the production of high-quality, delicious paneer.
Is prolonged sitting at work causing more back pain?
2. Heat the Milk:

Heating the milk is a crucial step in the cheese-making process. It helps to denature proteins, activate enzymes, and create the right conditions for curd formation. Here's how to heat the milk:
Choose the Right Milk:
- Use fresh, high-quality milk. Avoid ultra-pasteurized milk, as it may not set a good curd.
Pour Milk into the Pot:
- Pour the desired amount of milk into a large stainless steel pot. The pot should be large enough to accommodate the volume of milk you're using.
Heat Slowly:
- Heat the milk slowly over medium heat. Stir gently to ensure even heating and prevent the milk from scalding on the bottom of the pot.
Use a Thermometer:
- Attach a thermometer to the side of the pot or use a digital probe thermometer. It's important to monitor the temperature throughout the process.
Heat to Target Temperature:
- Heat the milk to the target temperature specified in your paneer recipe. Different cheeses require different temperatures, but a common starting point is around 86°F (30°C).
Maintain Temperature:
- Once the milk reaches the target temperature, maintain it for the specified duration. This allows the mesophilic culture and rennet to work effectively.
Monitor Temperature Changes:
- Some cheese recipes may require you to raise or lower the temperature during the process. Follow your specific recipe instructions for any temperature adjustments.
Turn Off Heat:
- When you've reached the desired temperature and completed any necessary steps, turn off the heat.
Remember to be patient and attentive during the heating process. It's essential to follow the specific temperature guidelines for the paneer you're making, as variations can significantly impact the final product.
3. Add Culture:
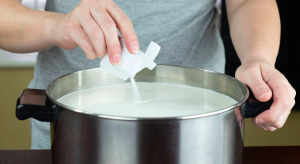
Adding culture is a crucial step in cheese-making, as it introduces beneficial bacteria that will help acidify the milk and contribute to the development of the cheese's flavor and texture. Here's how you can add culture to the milk:
Prepare Mesophilic Culture:
- Mesophilic culture is commonly used for cheeses that are made at lower temperatures. The culture typically comes in a powdered form. Follow the package instructions to determine the amount needed for the quantity of milk you're using.
Rehydrate the Culture:
- Sprinkle the mesophilic culture evenly over the surface of the milk. Allow it to rehydrate for a minute without stirring. This brief period allows the culture to absorb some moisture.
Stir in the Culture:
- After the rehydration period, use a long spoon or whisk to gently stir the culture into the milk. Use an up-and-down motion to ensure that the culture is evenly distributed.
Cover and Let Sit:
- Once the culture is mixed in, cover the pot with a lid. Allow the milk to rest undisturbed for a short period, usually around 5 minutes. This allows the bacteria in the culture to start working.
Maintain Temperature:
- While the culture is working, it's important to maintain the milk at the specified temperature. The mesophilic bacteria thrive in this temperature range, contributing to the acidification of the milk.
Note:
- If you're using a different type of culture, such as thermophilic culture for cheeses made at higher temperatures, follow the specific instructions provided with that culture.
Always refer to the specific cheese recipe you're using for the exact amount of culture and any additional instructions. Properly adding and incorporating the culture is essential for achieving the desired flavor and texture in your homemade cheeses.
4. Add Rennet:

Adding rennet is a critical step in the cheese-making process, as it is responsible for coagulating the milk and forming curds. Rennet contains enzymes that help solidify the milk proteins, creating the foundation for cheeses. Here's how to add rennet to the milk:
Dissolve Rennet:
- Rennet is typically available in tablet, liquid, or powder form. Follow the instructions on the rennet packaging to determine the appropriate amount needed for the quantity of milk you're using.
- If you're using rennet tablets, dissolve the required amount in a small amount of cool, chlorine-free water. Stir until the tablet is completely dissolved.
- If you're using liquid rennet, measure the specified amount as per your recipe.
Add Rennet to Milk:
- Once the rennet is prepared, gently pour it into the milk. Stir the milk for a short moment using an up-and-down motion, making sure the rennet is evenly distributed.
- After stirring, avoid agitating the milk further. Allow the milk to sit undisturbed to encourage the rennet to work.
Cover and Let Set:
- Cover the pot with a lid and let the milk sit undisturbed for a period specified in your recipe. This allows the rennet to coagulate the milk and form curds.
Check for a Clean Break:
- After the specified setting time, check for a clean break. Insert a knife or a clean finger into the curd. If the curd has been set properly, you should see a clean break, meaning the curd separates cleanly, leaving a defined cut.
Cut the Curd:
- Once you've achieved a clean break, cut the curd into small cubes. The size of the cubes will depend on your specific cheese recipe. Use a long knife to make vertical and horizontal cuts to the bottom of the pot.
- This cutting process helps release whey from the curds and prepares them for the next stages of cheese-making.
Always follow the guidelines in your specific paneer recipe for the amount of rennet needed and the duration of the setting time. The success of the cheese-making process depends on the proper use of rennet to achieve the desired curd formation.
5. Set the Curd:
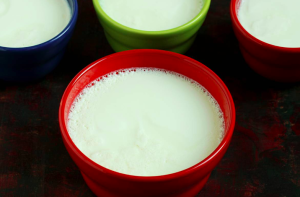
Setting the curd is a crucial step in the cheese-making process. Once the rennet has been added and allowed to work, the curd needs time to solidify. Here's how you can set the curd:
Check for a Clean Break:
- After the specified setting time mentioned in your recipe, check for a clean break. This involves inserting a knife or a clean finger into the curd and lifting it. If the curd breaks cleanly, leaving a well-defined cut, it's ready.
Cut the Curd:
- Once you've achieved a clean break, it's time to cut the curd. Use a long knife to make vertical and horizontal cuts, creating uniform cubes. The size of the cubes will depend on the type of paneer you're making. Larger cubes are typically used for softer cheeses, while smaller cubes are common for harder cheeses.
Let the Curd Rest:
- After cutting the curd, allow it to rest undisturbed. This rest period allows the cut surfaces of the curds to heal and expel whey.
Stirring (Optional):
- Some cheeses recipy may require stirring the curds gently during the rest period. Follow your specific recipe instructions for this step. Stirring can help control the moisture content and influence the final texture of the cheeses.
Maintain Temperature:
- It's essential to maintain the milk at the target temperature during this stage. The bacteria and enzymes are still active, and the curds need time to develop the desired flavor and texture.
Observe Curd Maturation:
- Keep an eye on the curd maturation process. The curds will continue to firm up, and you may notice whey separating from the curds.
Check for Proper Texture:
- Depending on the type of cheese, you may need to check for the proper texture of the curds. Some cheeses require a more delicate curd, while others need a firmer texture. Follow your recipe guidelines for this specific detail.
The duration of curd setting and maturation can vary depending on the type of cheese you're making. Refer to your cheese recipe for precise instructions on timing and any additional steps required during this phase of the cheese-making process.
Back pain at an early age? Know the cause and way to get rid of fit!
6. Cut the Curd:

Cutting the curd is a crucial step in the cheese-making process, as it helps release whey from the curds and determines the texture of the final cheese. The size and method of cutting depend on the type of cheese you're making. Here's a general guide on how to cut the curd:
Check for a Clean Break:
- Ensure that the curd has been set properly by checking for a clean break. Insert a knife or a clean finger into the curd, and if it breaks cleanly with a well-defined cut, it's ready for cutting.
Choose Cutting Size:
- The size of the curd cubes you cut will vary based on the paneer recipe. Larger cubes are often used for softer cheeses, while smaller cubes are common for harder cheeses. Follow your specific recipe for guidance on the cutting size.
Use a Long Knife:
- Use a long knife to make vertical and horizontal cuts through the curd, creating uniform cubes. Ensure that you cut to the bottom of the pot. This process helps to release whey from the curds and promotes the formation of distinct curd pieces.
Cutting Techniques:
- There are different cutting techniques depending on the desired curd size. Common techniques include:
- Vertical Cuts: Make straight cuts vertically through the curd mass.
- Horizontal Cuts: Make perpendicular cuts horizontally to the vertical cuts, creating a grid pattern.
- Diagonal Cuts: For certain cheeses, you may be instructed to make diagonal cuts to achieve a specific curd size and texture.
Let Cut Curds Rest:
- After cutting the curds, allow them to rest undisturbed. This rest period allows the cut surfaces to heal and expel whey. The duration of the rest period will depend on your specific cheese recipe.
Stirring (Optional):
- Some recipes may require gentle stirring of the cut curds during the rest period. Stirring helps control the moisture content and influences the final texture of the cheeses. Follow your recipe instructions for this step.
Maintain Temperature:
- Throughout the cutting and resting process, it's important to maintain the milk at the target temperature. This ensures that the bacteria and enzymes continue to work effectively.
Always refer to your specific paneer recipe for precise instructions on cutting the curd, including the size, technique, and any additional steps. The success of the cheese-making process relies on careful attention to these details.
7. Cook the Curds:
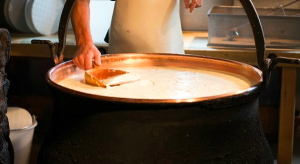
Cooking the curds is an important step in the cheese-making process. This step involves gradually increasing the temperature of the curds to expel whey and achieve the desired texture. The cooking temperature and duration can vary depending on the type of paneer you're making. Here's a general guide on how to cook the curds:
Check for Proper Cut Curds:
- Ensure that the curds have been properly cut and have rested according to your recipe.
Begin Heating:
- Gradually begin heating the curds. Increase the temperature slowly to avoid sudden changes that could affect the final texture of the cheese.
Use a Thermometer:
- Attach a thermometer to the side of the pot or use a digital probe thermometer to monitor the curd temperature. The target cooking temperature will depend on the specific paneer recipe, but it often ranges between 100°F and 130°F (38°C to 54°C).
Stirring:
- Stir the curds gently and consistently as they heat. Stirring helps prevent the curds from matting together and ensures even heating.
Controlled Heating:
- Continue heating the curds gradually, maintaining the target temperature. The rate of heating and the final temperature will depend on the type of cheese you're making. Some cheeses require a slow, gentle cook, while others may involve a more rapid increase in temperature.
Whey Expulsion:
- As the curds cook, you will observe whey being expelled. This is a natural part of the process, and the curds will shrink in size.
Test Curd Texture:
- Periodically test the texture of the curds by pressing a few between your fingers. The curds should feel firm but still somewhat tender. The exact texture will depend on the paneer variety and recipe.
Halt Cooking:
- Once the curds have reached the desired texture, stop the cooking process. This might involve maintaining the curds at a specific temperature for a set duration.
Drain Whey:
- Once the cooking process is complete, allow the curds to settle, and then drain off a portion of the whey. The amount of whey you drain will depend on your specific cheeses recipe.
Continue Cheese-Making Steps:
- Follow the remaining steps in your cheese recipe, which may include draining the whey, pressing the curds, salting the cheeses, and any additional steps required for the specific cheese variety.
Always refer to your specific cheese recipe for precise instructions on cooking the curds, including the target temperature, cooking duration, and any additional steps involved. Each paneer variety has its unique requirements, and following the recipe carefully will help you achieve the best results.
8. Drain the Whey:

Draining the whey is a crucial step in the cheese-making process, as it helps separate the curds from the liquid whey. Proper drainage contributes to the development of the cheese's texture and flavor. Here's how you can drain the whey from the curds:
Prepare Draining Setup:
- Set up a colander or a cheese mold lined with cheesecloth over a clean container to catch the whey. Ensure that the colander or mold is large enough to accommodate the curds.
Transfer Curds:
- Gently transfer the cooked curds to the colander or cheesemold. You can use a slotted spoon or carefully pour the curds and whey into the colander.
Allow Whey to Drain:
- Let the whey drain from the curds naturally. The whey will pass through the cheesecloth or perforations in the colander, leaving the curds behind.
Optional Pressing (for Some Cheeses):
- Depending on the type of paneer you're making, you may choose to press the curds at this stage to expel more whey and shape the cheese. If pressing is required, follow your specific recipe's instructions for applying pressure and for how long.
Collect Whey:
- Save the whey in a separate container if you intend to use it for other purposes. Whey is rich in nutrients and can be used in cooking, baking, or even as a liquid in fermentations.
Cover Curds (Optional):
- If your recipe calls for it, cover the curds with cheesecloth or a clean cloth to protect them during the draining process. This is particularly relevant if you're allowing the curds to drain over an extended period.
https://livewithgreen.com/learn-how-to-make-cheese-at-home/